What is Facebook Pixel?
Facebook Pixel is a code embedded into a website that tracks the actions of its visitors. This data serves to:
- measure Facebook ads performance;
- define custom audiences for targeting and setting up campaigns with dynamic ads;
- analyze the effectiveness of your site’s conversion funnels.
How Facebook Pixel works
- A user visits your website performing some actions such as searching for products, adding them to cart, completing checkout, etc.
- The Facebook Pixel tracks these events and syncs with Facebook cookies in the user’s web browser.
- After the sync process, the user is being tagged as a part of certain target groups.
- When the user opens Facebook, the platform already knows which ads to show.
Is there anything wrong with it?
These days people are becoming more and more cautious about their data being shared over the internet. With the rise of concerns, new privacy regulations such as General Data Protection Regulation (GDPR), California Consumer Privacy Act (CCPA), and others came into effect. Moreover, web browsers implement changes to their latest versions towards privacy protection that affects third-party cookie sharing. As all the Facebook Pixel data is stored in cookie files locally on the user’s device — it’s becoming hard to track all the clients’ actions.
Is there a workaround?
If it’s challenging to work with cross-website cookies, can’t we perform the same data transfer actions without using those? Yes, we can — with the help of Facebook Conversions API, which tracks the events needed and store them on the server-side.
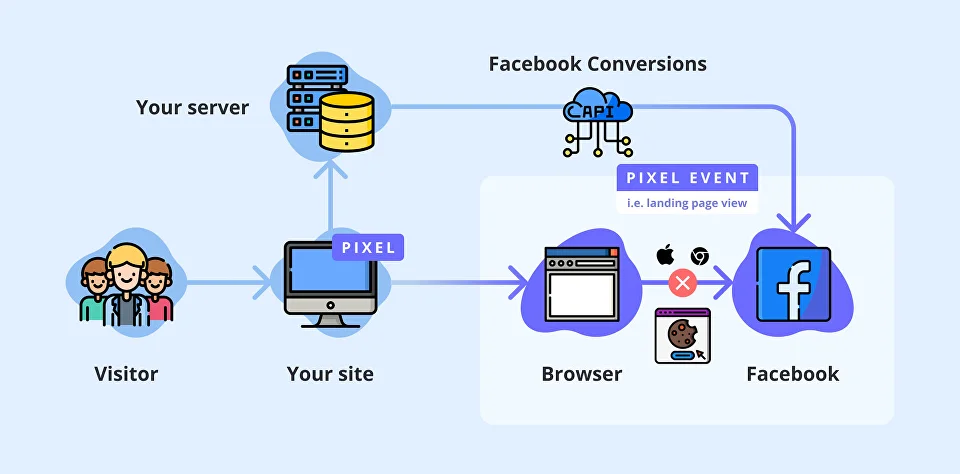
How Facebook Conversions API works
- A user visits your website with a Facebook Pixel installed.
- The pixel stores the information about the user in a first-party cookie file (this cookie file operates with your website only).
- Your server saves this data that also includes information on how to distinguish this particular user from others.
- When the user triggers an event, the server sends a request with the information about the event and the user to the Facebook server.
How to implement Facebook Conversions API
To implement Facebook Conversions API you will need a Facebook App, Facebook Business Manager, and Facebook Pixel installed on your website that is associated with your Business Manager.
Step by step, here we go:
- Open your Business Manager, navigate to Events Manager, click on Add New Data Source, and hit FB Conversions API.
- Open Settings, choose your Pixel and click on Next.
- Choose the existing App to work with API. If you don’t have one — click on Create New App and fill out the forms.
- Create a new system user and click on Create.
- Click on Generate Access Token, copy it, and save it locally on your computer. Hit Next.
- Use the saved token to implement the API calls by yourself with the help of documentation, or hit the Send instructions button to send them to your developer.
- Once it’s done, you can start sending data to the Facebook server.
Takeaway
The era of cookie-based advertisements is coming to its end. Companies are searching for alternative ways to operate with the data gathered from their customers. One of these methods is Facebook Conversions API. It might be more complicated to implement as it’s not just a few raws of code to copy and paste, but it allows you to bypass the new limitations and gives you better control over the data you share with the ad publishers.